DatabaseAdmin.Net

Database Administration

Database administrator's activities include:
How to transfer ( move or copy) databases with SQL Server

To use the Copy Database Wizard, you must specify the following:
The source server where the databases to be copied reside.
The destination server to which the databases are to be copied or moved.
The databases to be moved or copied.
The name of a target database, if different than the name of the source database.
The source database name can be use for the copied or moved database only if name conflicts do not exist on the destination server. If name conflicts exist, you must resolve them manually on the destination server before you can use the source database name there.

Other objects to be copied or moved; for example, logins, shared objects from the master database, jobs and maintenance plans, and user-defined error messages.

The schedule for the copy or move operation, if you want it to run at a later time. 

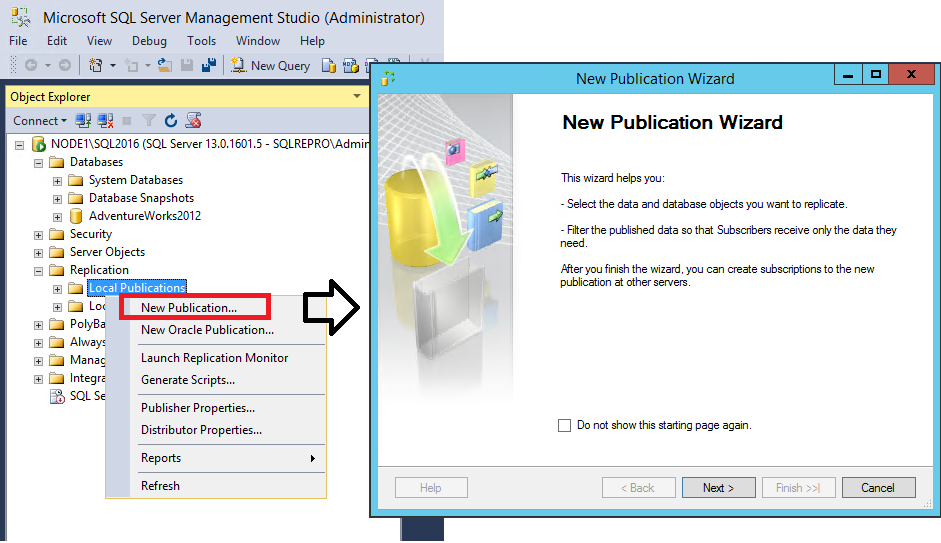
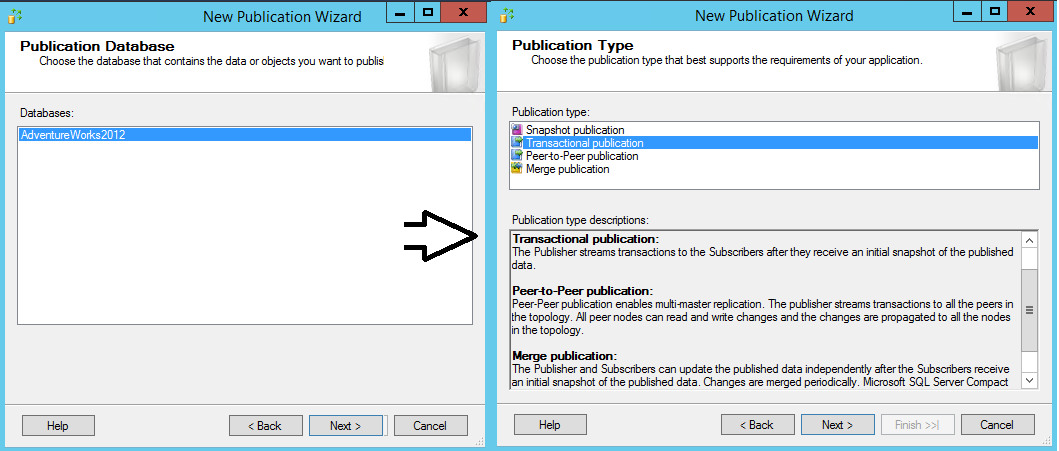
The following replication models are used for replicating databases in SQL Server
Peer-to-peer model, Central publisher model, Central publisher with remote distributor model, Central subscriber model, publishing subscriber
model.  Replication is one of the options in SQL Server Management Studio as seen below.

SQL Server Management Studio is where most of the functionality of SQL server is location and it includes options: Databases, Security, Server Objects, Replication, Management, SQL Server Agent Maintaining database and ensuring its availability to users As with all files, maintaining databases includes making sure that data is backed up, both databases and servers and defragged, computer components are in good working, updates and applied and antivirus software is kept current.

 Controlling privileges and permissions to database users

Privileges and permissions to databases can be assigned both in the Roles section of SQL Server Server Management Studio as well as inside SQL code.

Monitoring database performance

To open Activity Monitor in SQL Server Management Studio

1.      On the SQL Server Management Studio standard toolbar, click Activity Monitor.

2.      In the Connect to Server dialog box, select the server name and authentication mode, and then click Connect.

You can also open Activity Monitor at any time by pressing CTRL+ALT A.

To open Activity Monitor in Object Explorer

In Object Explorer, right-click the instance name, and then select Activity Monitor.

To open Activity Monitor when opening SQL Server Management Studio

1.      On the Tools menu, click Options.
2.      In the Options dialog box, expand Environment, and then select General.
3.      In the At startup box, select Open Object Explorer and Activity Monitor.
4.      To activate the changes, close and reopen SQL Server Management Studio.

Database backup and recovery
SQL Server Databases may be backed up with either SQL code or with the SQL Server Management Studio

Example

A. Backing up to a disk device

The following example backs up the complete AdventureWorks2008R2 database to disk, by using FORMAT to create a new media set. USE AdventureWorks2008R2; GO BACKUP DATABASE AdventureWorks2008R2 TO DISK = 'Z:\SQLServerBackups\AdventureWorks2008R2.Bak' WITH FORMAT, MEDIANAME = 'Z_SQLServerBackups', NAME = 'Full Backup of AdventureWorks2008R2'; 1.      After connecting to the appropriate instance of the Microsoft SQL Server Database Engine, in Object Explorer, click the server name to expand the server tree.

2.      Expand Databases, and depending on the database, either select a user database or expand System Databases and select a system database.

3.      Right-click the database, point to Tasks, and then click Back Up. The
Back Up Database dialog box appears.

4.      In the Database list box, verify the database name. You can optionally select a different database from the list.

5.      You can perform a database backup for any recovery model (FULL,
BULK_LOGGED, or SIMPLE).

6.      In the Backup type list box, select Full.

7.      Optionally, you can select Copy Only Backup to create a copy-only backup. A copy-only backup is a SQL Server backup that is independent of the sequence of conventional SQL Server backups.  The same could be said in reverse for Restore instead of Backup:


--Restore the full database backup (from backup set 1).

RESTORE DATABASE AdventureWorks2008R2

  FROM DISK = 'Z:\SQLServerBackups\AdventureWorks2008R2FullRM.bak'

  WITH FILE=1,

    NORECOVERY;

To restore a full database backup:

1.       After you connect to the appropriate instance of the Microsoft SQL Server Database Engine, in Object Explorer, click the server name to expand the server tree.

2.       Expand Databases. Depending on the database, either select a user database or expand System Databases, and then select a system database.

3.       Right-click the database, point to Tasks, and then click Restore.

4.       Click Database, which opens the Restore Database dialog box.

5.       On the General page, the name of the restoring database appears in the To database list box. To create a new database, enter its name in the list box.

6.       In the To a point in time text box, either retain the default (Most recent possible) or select a specific date and time by clicking the browse button, which opens the Point in Time Restore dialog box.

7.       To specify the source and location of the backup sets to restore, click one of the following options:

From database

Enter a database name in the list box.

From device

Click the browse button, which opens the Specify Backup dialog box. In the Backup media list box, select one of the listed device types. To select one or more devices for the Backup location list box, click Add. After you add the devices you want to the Backup location list box, click OK to return to the General page.

8.       In the Select the backup sets to restore grid, select the backups to restore. This grid displays the backups available for the specified location. By default, a recovery plan is suggested. To override the suggested recovery plan, you can change the selections in the grid. Any backups that depend on a deselected backup are deselected automatically.

9.       To view or select the advanced options, click Options in the Select a page pane.


10.    In the Restore options panel, you can choose any of the following options, if appropriate for your situation: Overwrite the existing database

Preserve the replication settings

Prompt before restoring each backup

Restrict access to the restored database

11.    Optionally, you can restore the database to a new location by specifying a new restore destination for each file in the Restore the database files as grid.

12.    The Recovery state panel determines the state of the database after the restore operation.
Database Security


Part of database security is computer security.  There are many protocols for encrypting data that is being transmitted.  There are many types of firewalls, routers and security software for blocking potential threats such as viruses and hackers from destroying or steeling your information. Security is the 2nd option inside SQL Server Management Studio object explorer which restricts different database user's rights to database objects, enables and disables user instances, login permissions, and other security precautions.